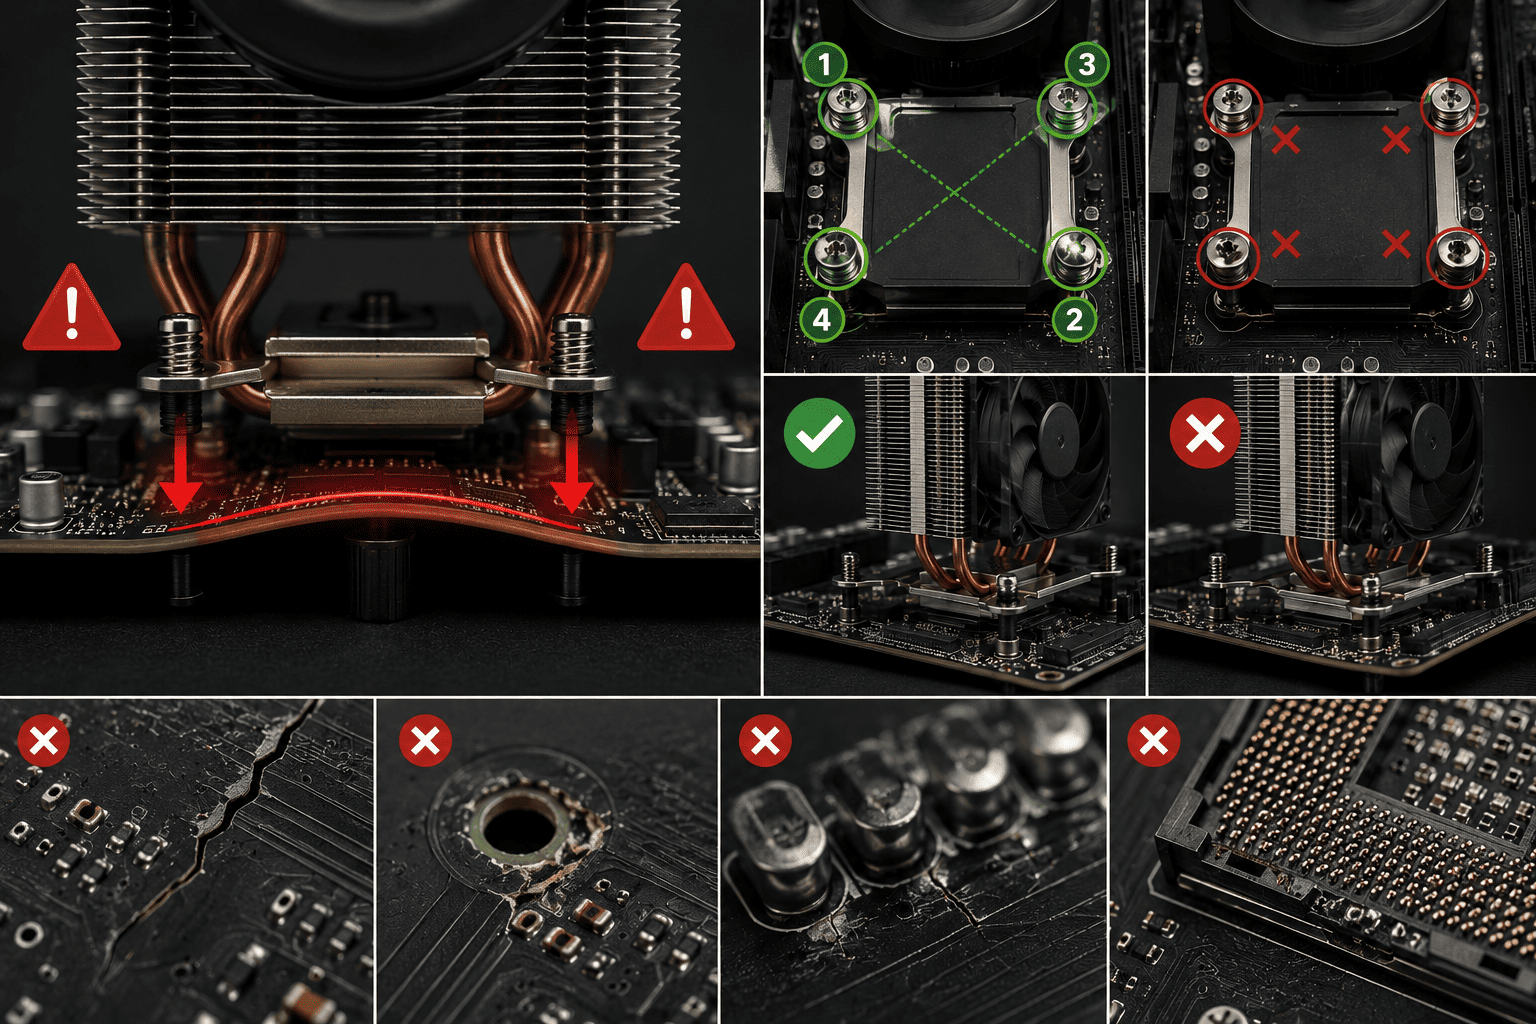
Installing a CPU cooler requires firm mounting, but too much screw pressure can cause unnecessary stress on the motherboard PCB. Excessive tightening may flex the board, damage solder joints, affect CPU socket contact, or in severe cases contribute to PCB cracks.
A cooler should be mounted evenly and according to the manufacturer's instructions. More pressure does not always mean better cooling. Proper mounting pressure and even tightening are more important than simply making the screws as tight as possible.
Problem
The customer installs or replaces a CPU cooler and then experiences no POST, random crashes, RAM detection problems, boot failures, or motherboard instability.
In some cases, the PC worked normally before the cooler was installed. After tightening the cooler, the system may suddenly stop booting or develop intermittent hardware problems.
What Problem Is the Customer Facing?
Customers may notice:
- PC does not boot after cooler installation
- No display after CPU cooler replacement
- Motherboard bends around the CPU socket
- RAM is not detected
- PC repeatedly restarts
- System becomes unstable
- CPU temperatures remain unusually high
- Cooler appears uneven
- Motherboard shows visible flex
- Problems disappear when cooler pressure is reduced
These symptoms do not automatically mean the CPU or motherboard is defective. Incorrect mounting pressure can sometimes be the trigger.
Root Causes of the Problem
1. Excessive Screw Pressure
Over-tightening applies unnecessary mechanical force to the motherboard and CPU socket area.
2. Uneven Tightening
Tightening one screw completely before the others can create uneven pressure and cause the motherboard to flex.
3. Incorrect Mounting Hardware
Using the wrong screws, standoffs, brackets, or mounting system can create excessive or uneven pressure.
4. Missing or Incorrect Backplate
Some coolers require a specific backplate to distribute mounting pressure. Incorrect installation can transfer too much force to a small area.
5. Motherboard Flex
A motherboard is designed to have some mechanical strength, but excessive bending can stress PCB layers, solder joints, traces, and socket connections.
6. Poor Cooler Installation
A cooler that is not seated evenly can create uneven pressure and potentially affect CPU-to-cooler contact.
7. Repeated Reinstallation
Repeatedly removing and reinstalling a cooler with excessive force can increase mechanical stress on mounting points.
How Can Customers Identify the Issue?
Watch for:
- Motherboard visibly bending near the CPU socket
- No POST after cooler installation
- CPU or DRAM debug LED staying on
- Random system crashes
- Memory detection problems
- System instability after cooler replacement
- Cooler screws reaching the end of their travel too aggressively
- Uneven cooler contact
- Unusually high CPU temperatures
- Cracked PCB or damaged solder joints in severe cases
Possible Solutions
1. Follow the Cooler Manufacturer's Instructions
Always use the mounting hardware and installation procedure designed for the specific cooler and CPU socket.
2. Tighten Screws Evenly
Instead of completely tightening one screw at a time, gradually tighten the screws in a cross or diagonal pattern.
For example:
Top-left → Bottom-right → Top-right → Bottom-left
Repeat the sequence gradually until the cooler is securely mounted.
3. Do Not Force the Screws
If a screw becomes unusually difficult to turn, stop and inspect the mounting hardware.
A screw should not require excessive force simply to secure the cooler.
4. Check Motherboard Flex
Before powering on the system, look at the motherboard from the side.
A small amount of flex may occur during cooler installation, but significant bending is a warning sign that the mounting system should be checked.
5. Verify the Backplate and Standoffs
Make sure:
- Correct backplate is installed
- Correct standoffs are being used
- Mounting brackets are correctly oriented
- Screws match the cooler
- No unnecessary washers or spacers have been added
6. Check CPU Cooler Contact
After installation, verify that the cooler is sitting evenly on the CPU.
Poor contact can cause high temperatures even when the cooler appears firmly mounted.
7. Check RAM and POST After Installation
If the computer fails to boot after cooler installation, inspect:
- RAM seating
- CPU power connector
- CPU socket
- Cooler mounting pressure
- Motherboard diagnostic LEDs
- BIOS/UEFI status
8. Inspect for Physical Damage
If excessive pressure has already been applied, a technician can inspect the motherboard for:
- Cracked PCB
- Damaged solder joints
- Socket damage
- Lifted components
- Damaged traces
- Mechanical stress around mounting holes
9. Use Manufacturer-Specified Torque When Provided
Some cooling solutions provide specific mounting instructions or torque recommendations. If the manufacturer specifies a torque value, use the recommended value rather than guessing.
For coolers without a specified torque value, follow the manufacturer's tightening procedure and avoid excessive force.
How to Safely Install a CPU Cooler
Check compatibility → Install correct backplate → Position cooler → Start all screws → Tighten gradually in a cross pattern → Stop when properly secured → Check motherboard flex → Verify temperatures → Test system stability
The objective is secure and even contact, not maximum screw tightness.
Why Choose Guru Computer Solution?
1. Certified Technicians
Our technicians can inspect CPU cooler installation, motherboard flex, socket condition, and cooling performance.
2. Genuine Parts
We use suitable mounting hardware and quality replacement components when required.
3. Fast Turnaround
Cooler installation, thermal maintenance, and hardware diagnostics can often be completed quickly.
4. Warranty Support
Eligible repair and replacement services come with warranty support.
5. Affordable Pricing
We diagnose the actual cause before recommending expensive motherboard or CPU replacement.